|
This
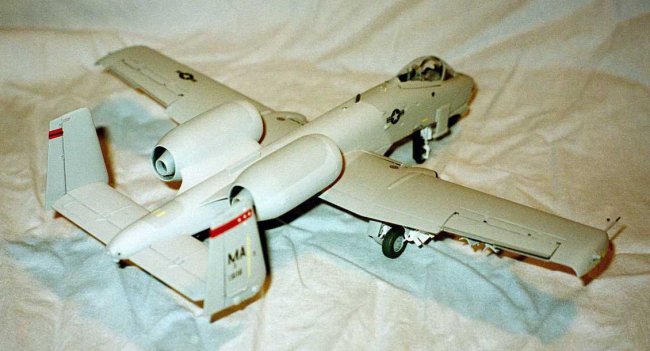
is my 1/48th Scale Monogram A-10A Thunderbolt II, or better know as
the Warthog. The markings represent the 131st Fighter Squadron of the
104th Fighter Wing based at Barnes Air National Guard base in
Westfield - about 15 miles from me. The model was made at the request of the
commander of the Mass Air National Guard for his collection.
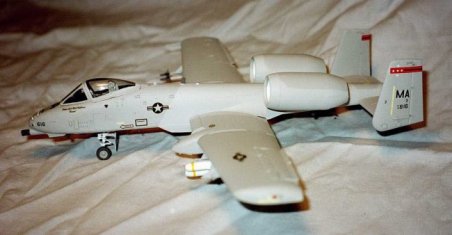
This
is the second 48th Hog I have built, with the first about 8 years
ago, shortly after getting back in to the hobby. I had to relearn the challenges
of building the kit. I also wanted to make it a modern A-10 with the LASTE (Low
Altitude Safety and Targeting Enhancement) updates. This included noticeable
things such as antennae on the tails and under the stabilizers, and formation
lights on the wing tips, forward fuselage sides, behind the canopy and top and
bottom of the fuselage between the tails.
Construction
Seeing
the kit has raised panel lines and lots of rivets, I lost some detail, and had a
tough time correcting the seam along the entire top of the fuselage. You can
still see the “step” that exists at certain angles. The engine assembly
proved to be a challenge as well. I added the small vent cover in front of the
larger one on the left-front fuselage using sanded sprue.
I
added a LOT of weight stuffed inside the forward fuselage. I used fishing
weights that are shaped like a pear, and placed 4 of them behind the canopy on
the lower part of the fuselage. I didn’t want all the weight directly over the
nose gear. I used 5-minute epoxy to hold the weights.
|
Click on
images below to see larger images
|
|

|
The
canopy was to be closed and Monogram molds it open. I gently scored the hinge
area, and slowly bent it. However… SNAP it went. This was repaired later on.
I
closed the wing speed brakes, as these are molded open. I have an old Monogram
Hog lying around and I had built it with the brakes open. I practised on that
one to get the hang of it. On this model, I inserted the brake into the wing,
and then gently bent it close keeping equal pressure along it. It worked out
well, and practising on the old one sure helped a lot.
The
antennae bumps on the tails proved to be the most challenging of the LASTE
updates. I went through many trials and examples, and settled on the ones you
see. I am not overly happy with them. I tried to make them using Wayne Hui’s
method on his A-10, but didn’t even come close. I resorted to reshaping sprue
and cutting disks and sanding.
|
Click on
images below to see larger images
|

|

|
Painting
and Decals
The
paint scheme is the current 2 tone grey with a gunship grey false canopy under
the forward fuselage. The dark grey portion that sweeps up the sides of the
fuselage should be tapered back more instead of the steep incline. I realized
this after decalling, and decided to leave it. But in contemplating this fix, I
forgot to add the black circular decals (similar to ones on the wings) on the
spine of the fuselage! I realized this when reviewing the pictures I took. I
have added them since, though.
I
did a mix of colors on the gear and wheels – white gear and grey wheels.
Instead of trying to paint and mask the engine intakes white, I used white decal
strips to line the intake. I did a dark wash on the compressor blades to give it
a bit of depth.
|
There
are no current decal markings for the 104th FW A-10s in 1/48th,
so I had to improvise. The decals are a mix of Superscale, ASTRA/DACO and
spares. The tail markings
are red and black decal stripes from Microscale sheets. The stars are from
a Repliscale sheet for a VMFA-321 Phantom. The star pattern represents the
squadron “131”. The tail codes are from the old Superscale sheet for
the 104th, and serials are spares. The fuselage markings are
all from the ASTRA/DACO sheet. - this includes the formation light panels.
This sheet apparently had a reprint by ASTRA/DACO, and was missing a
couple of the formation lights. On the website, it shows the decal sheet,
but the lights are present. I
got the lights from my spares. |
Click on
image below to see larger image
|

|
|
As
published on ARC, I tried the method of using Future as a setting solution as
opposed to gloss coating the entire model. This is where you place Future just
in the area to receive the decal and wipe of the excess. I had no silvering that
I could see. Only drawback was trying to position the decal – if it rested on
a dull area, it didn’t budge easily. However, I liked the method and it saved
me a lot of time by not gloss coating the entire model and waiting for it to
dry.
Using
the computer and printer, I made a pilot name for the cockpit area, and the
serial number decal in front of the windscreen. This saved me piecing together 5
small numbers.
Weapons
Weapons
consist of 2 AIM-9 Sidewinders, 4 AGM-65 Mavericks and 2 Mk 20 Rockeyes. I
painted the Mavericks and Rockeyes white. Most, if not all Mavericks are now
grey, but I went with white to offset the grey model. The 2 Sidewinders are
mounted to a portion of a launcher for the Mavericks, not one that represents
the real type in use. The decals for the Mavericks and Sidewinders came from a
Superscale sheet for Desert Storm A-10s. It included stencils for different
weapons. I wish more of these markings were available in decal form.
Final
Steps
The
model received a coat of Testors Dullcote to seal everything. Finally, a base
(not shown) was made from my usual stash of picture frames.
Ken
|