|
Introduction
Ever since I picked up the 1985 Hasegawa Catalogue I have wanted to do the
Fokker Triplane as a "skeleton aircraft". I really wanted that 1:8
kit, simply because it looked so "intense". Lots of parts packed
within a very small airframe. In 1997 I visited my boss at home. I then saw the
kind of work that was involved in building a similar kit, the 1:8 Sopwith Camel
which also came from Hasegawa, and I quickly realised that at the pace I build
models I would NEVER be able to finish a kit in the same scale. Oh well.
Then along came Eduard with their 1:72 see-through Camel which was quickly
purchased and started on. May it rest in pieces. I tried assembling it, but just
couldn't get it right. I guess I was kind of new to Superglue, and in addition
the Eduard engineering and my way of thinking did not match at the time.
Moving on in my "skeletal airplane saga", I happened to be browsing
around in the in Bangkok in January 2001. There it was... a 1:48 Triplane in
brass and what seemed like white metal from some spurious Japanese manufacturer!
Built up it looked complex, but do-able. Looking at the price I found it rather
expensive, but I decided on buying it nevertheless and addressed the shop-owner.
Only to find he had no unbuilt kits left. Sigh.
A month later I was in Oslo, our capital. The occasion was the Norwegian
National Contest, I'd just spent loads of money on heaps of brass and plastic,
and was about to call it a day. There it was: Eduard's Fokker Dr.1 in 1:72. The
box was flat and unconventional. Through the box window I could see nothing but
nickel plated brass. Holding the kit in my hands I JUST COULDN'T LET GO OF IT!
Talk about battles going on in my head! There was a "You DON'T need another
kit! You'll NEVER finish it! Remember the Camel incident!" coming in one
ear, while a soothing voice in the other ear stated: "It's a childhood
dream, Kyrre... buy it, build it. What's one new kit among a hundred others?
It's only money, Kyrre... Follow your dreams..."
We've had a really horrible summer
here in Northern Norway in 2001, which forced me to stay inside most of my spare
time. Towards the end of June, I flipped open the box for the final push. Armed
with superthin superglue, a newly aquired "Third Hand" and my best
tweezers I went to the task with high spirits. And the spirits never did
descend!
I would have loved to tell you all what a difficult build this was. But it
wasn't. I guess it's a bit like the Japanese art of folding paper -
Origami. This excercise was mostly about folding brass and adding the
occasional plastic part, only to touch the parts with some superglue to let the
capillary actions do the work!
The kit:
In addition to the brass frets you actually get a whole 1:72 polystyrene Fokker,
the same as Eduard's conventional release, with the exception of the three wing
spars which come attached to one of the plastic sprues. Not many plastic parts
are needed. Among them are the spars, the guns, the engine and the cowling. The
undercarriage and the propeller also come in this category, though they're all
enhanced with brass fiddly bits.
|
Click on images below to
see larger images |
 |
 |
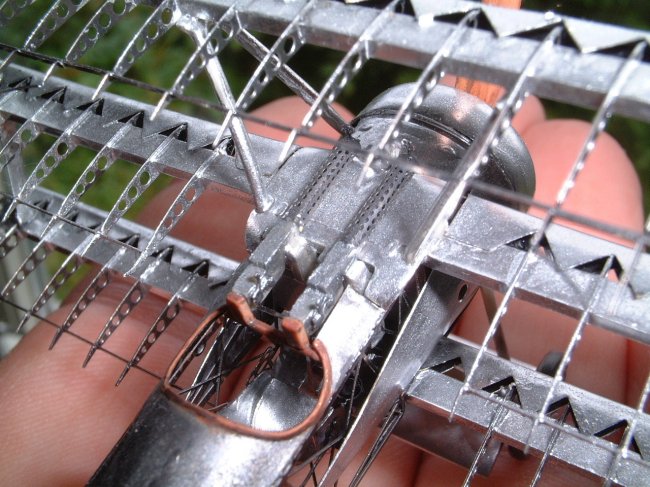
Following the instructions I
progressed quickly. Using a glass pane from an old picture frame as a cutting
board I used a No15 blade to cut loose the brass parts, followed by a quick
swipe with a jewellers file to remove the stubs.
I used different means to fold the parts correctly. Some times I would simply
use the tweezers, other times, like with the "zigzagged" plywood in
front of the wing profiles, I would fold the parts around a ruler, a rod or
preshaped cardboard. Experimenting did it. The instructions suggest you fold the
brass around the leading edge of the included plastic wings, but with the
tension in the metal I found it very difficult to obtain the correct airfoil. It
is also apparent in the pictures that I did struggle a bit with
these parts.
The wheels had the option of being hollowed out to allow for brass spokes as a
replacement. Quickly done, it sure added to the overall impression. The
undercarriage "vane" or wing did not have an etched replacement, which
I did find a bit curious. Still, it's my understanding that the airfoil shape
was made with plywood panels, and I guess that's why it was left as it was. And
that's also why I didn't attempt to make a replacement!
|
Click on images below to
see larger images |
|

|
 |
 |
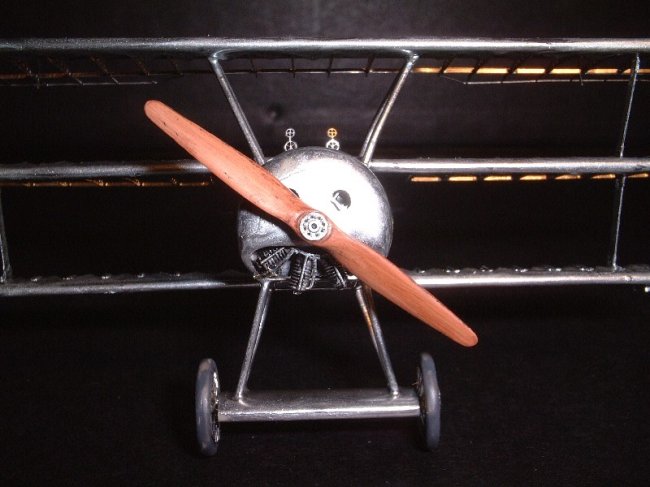
Paint
Eduard would have
you paint wooden parts of the aircraft in "Wood" colour while
the originally metal parts of the airframe should be painted in a greyish
primer. I considered following the instructions
for a while, but decided instead to utilize Humbrol's 191 Chrome Silver
all over, with a few details picked out in the appropriate colour. Some
leather parts were painted in uh.. "Leather", while the
propeller received tan as a base colour for the pencilled wood-grain. Of
course the silver finish is technically and historically inaccurate.
Nevertheless the tiny shiny kit looks really impressive against a black
background, so I sure don't regret having done it this way. I might even
try the same thing with some of the other Eduard
kits... |
| Click
on image below to see larger image |
 |
|
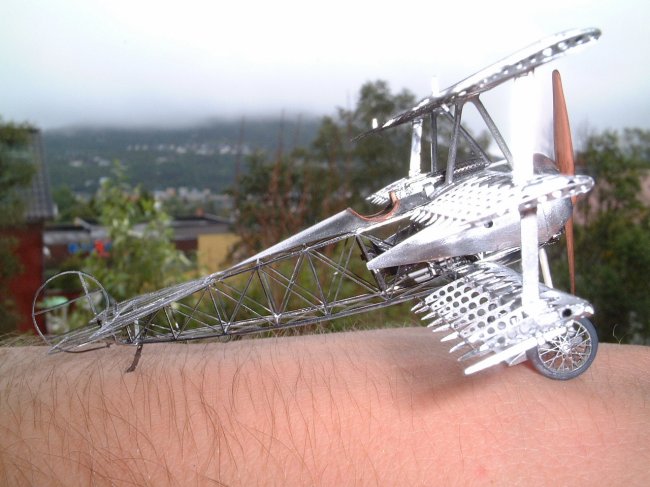
Finally
To conclude I can heartily recommend the Eduard See-through Series, at least
their latest efforts. The Fokker Dr.1 sure was a fun venture!
Happy Modelling
Kyrre
|
|