|
History
'Stuka' or 'Sturzkampfflugzeug' was the general German
terminology for dive-bombers, but the Ju 87 with its inverted gull wing, and
fixed-undercarriage was the most famous and feared of all. The Ju 87 was ugly,
sturdy, accurate, but very vulnerable to enemy fighters; its use demanded air
superiority. But its effectiveness in destroying fortifications or ships, or
just scaring people, was undoubted. On the eastern front the last Ju 87 versions
were employed as anti-tank aircraft with under wing 37mm guns. Over 5700 built.
Berta (B) - The Berta evolved in an attempt
to solve the problems discovered in the disappointing performance of the Anton.
The primary difference was the installation of the Junkers Jumo 211 A engine,
which was rated at 1,100hp. This gave the Ju 87B the necessary power to be a
truly effective dive-bomber. The cowling was redesigned to allow for this
installation and included the shifting of several support systems and a larger,
rounder radiator bath. Another feature that was a completely redesigned of the
landing struts. Gone were the ungainly trousers and in there place were much
more aerodynamically efficient spats. Also introduced was an automatic pull-out
device to prevent pilots that blacked out during a being rudely awakened by an
untimely impact into the terrain. Five Ju 87B-1's flew with the Condor Legion
and completely eclipsed the Antons performance, thus securing for itself a place
in the RLM's tight production schedule.
The Berta was developed into several different versions including the Trop
version used by the Afrika Corps and the long ranged R version that was equipped
with "strap-on" fuel tanks. The Berta served with distinction in the
Polish invasion but revealed severe vulnerabilities a year later during the
Battle of Britain, forcing them to be withdrawn to theatres where the Luftwaffe
enjoyed some sort of air superiority. The Berta served throughout the war,
mainly on the Eastern front and with various air forces, including the
Slovakian, Romanian, Hungarian and Italy's Regia Aeronautica.
The Berta was also used as the basis for the C variant which was being developed
as a carrier based dive bomber. The C variant was cancelled when it was realized
that the Berta's airframe was obsolete.
The
Kit
The
kit is of standard Hasegawa quality nothing really fancy, just a good kit.
The
instructions are clear and concise, the sprues are clean and require only
minimal cleanup. The decals are
provided for 1 aircraft, as this particular kit was a repackage with decals for
Sicily. The Stuka is well documented on the net and in many books.
I chose the Eaglestrike decal set 48021 which includes decals for 4
aircraft.
Aries
Update
This is my first crack at an Aries update, admittedly I am a verlinden
guy from 10 years ago. My first
impression of the kit was WOW !! a ton of clean resin, photo etch is clean and
easy to work with. I was so
impressed that I orders 3 more updates instantly for future projects.. IMHO
Verlinden has real competition in this area.
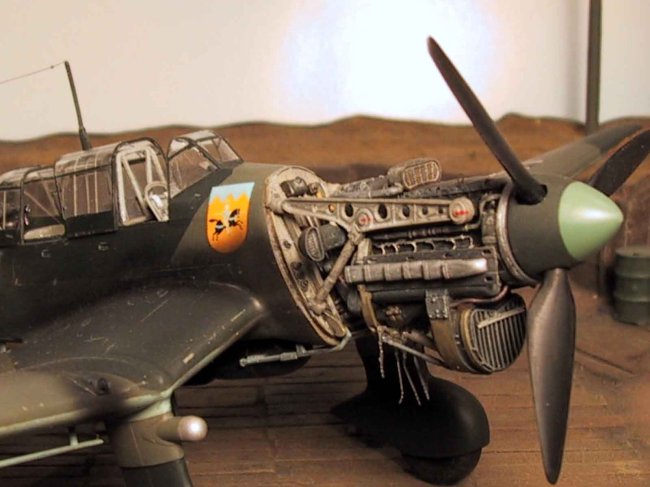
The kit includes a full cockpit replacement, full engine and firewall and
is in a word awesome. I would find out later that it is also a ton of work…
more on that later.
Construction
|
First
up was the cockpit, my favorite part. The
update includes a floor and sidewalls, you have to smooth the kits sidewalls to
get the resin to fit, also thin the resin as far as you dare so it will flex to
the curvature of the fuselage. The
best way I found to
get
a good fit was to use epoxy and clamp the resin to the sidewall with the flex
intact. BE CAREFUL !! The floor is
very straightforward and fits to the sidewalls nicely. The only snafus with the cockpit was the oxygen bottle for
the rear gunner, be careful where you position it, to far forward and it
interferes with the
radio panel installed later and to far back and the rear
seat won’t fit. My other beef is
the rudder pedal assembly 3 very small and thin pieces of photo etch bent in a
million different positions, maybe I just need smaller hand but I had trouble
getting this to fit right, just beware. The
interior was painted RLM 02 with a black wash then dry brushed various shades of
grey. The instrument panel is nice
, I would recommend painting the back of the film white to get the details to
show through better, I like the effect I ended up with.
|
| Click
on images below to see larger images |
 |
|
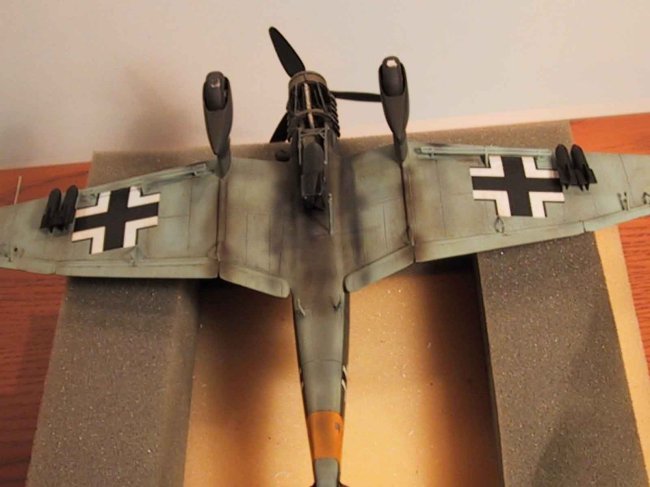
| For
the wings, pretty straight forward but you must remove the ugly triangle molds
on the flaps and replace them with copper wire. Not big surgery but check out
the results, much more realistic. Watch
the fit of the training edge of the wings, it’s a bugger to fix if it need
sanding. A little time here will say hours later.
When fitting the wing to fuselage there are 2 areas to watch.
The wing hits the target window under the pilot’s feet but nothing a
file wont fix, the training edge of the wing wont match the fuselage if you
didn’t sand the cockpit floor enough. Of course I find this out after the fact
so hopefully you wont make the same mistake and idiot here.
|
| Click
on images below to see larger images |
 |
|
The
fuselage with the update added needs some attention. You will find the cockpit floor needs to be spread for the
wing root to fit on the top, thus messing up the training edge mentioned
earlier. You need to do this for kit part J26 to even come close to fitting.
Further surgery is required for the firewall installation but really
straightforward. The Aries
instructions walk you through this efficiently.
I decided to move the elevators but if you do this get into the books
because the mass balance must be adjusted to match the elevator position.
Similar with the rudder positioning, the top is very thin so be cautious.
Before
I forget, the stupid landing light I dropped inside the finished wing, it took 2
days to get it out, a lot of neat words came from the basement when I did
this… stupid fool.
The
Canopy was coated in future floor wax to give a nice gloss, a lot of masking
here but worth the effort. In
hindsight I would have ordered the ez masks but I was to impatient to wait for
the order.. next time.
Paint
& Decals
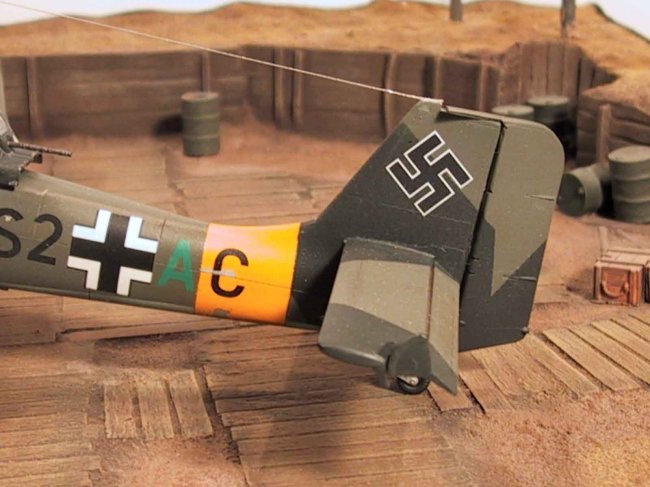
Not
much here, simple RLM 65/70/71 with a lot of pastel weathering on the bottom,
paint chips are from a undercoat of SNJ aluminum and pulling on the masking
tape. RLM 25 on the spinner.
Raw umber oil wash and some dry brushing to finish.
Decals went on great, typical of Aeromaster.
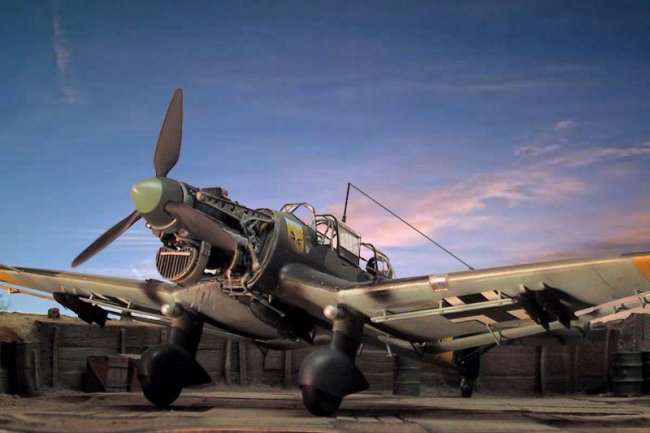
I chose to do the aircraft flown by Gruppen Kommandeur Helmut Bode.
Sevastapol Crimea Russia, June 1942.
Helmet commanded 3/St.G 77 throughout the Battle of Britain and on
into Barbarossa, the invasion of Russia.
RLM 04 Gelg theatre ID bands on the wing tips and fuselage.
Conclusion
/ Photography
Great kit, lots of work but worth the effort, I placed the engine on
last, a small flat coat of Poly S and she was ready for the display case. A very
satisfying project, approx 100 hours to complete.
The pictures are taken with a Canon A20 Powershot,
the 3x optical zoom with macro works good, I am still learning how to run
it but its coming together. Lighting
is just the same lights I model with.
Footnote:
The base is a 10 year old verlinden mold, I don’t think its still
available.
|
Click on images below to
see larger images |
 |
 |
|
|