|
The A-10 Thunderbolt
II, or Warthog, is certainly an ungainly looking aircraft by modern standards,
but it is a combat proven, highly effective close air support weapon.
During Operation Desert Storm, the 'Hog' showed just what a low-tech aircraft
could do, and performed very well during its 'baptism of fire' in the Persian
Gulf. In fact, it could almost be classified as a terror weapon, causing
Iraqi tankers to bail out of their rides at the mere sound of the A-10's
whistling TF-34 turbofan engines. the Iraqis even devised several sinister
names for the Hog, including "The Black Gun', Whistling Death', and
'Circling Buzzard' Among the A-10's remarkable abilities are its ability
to carry a very large, varied payload of ordnance to the target, loiter around
the target area for extended periods of time, and its ability to take a genuine
punishing and still return to base. Hogs often worked in groups of two or
more, and a pair of A-10s could lay ordnance on a target every eight seconds.
The A-10 also has
some other advantages that are unique to its design: First, it has the
ability to turn on a dime, and handles well at slow speed. This provides
remarkable agility, and increased survivability, as well as the means to
continue to bring its weapons to bear on hostile targets rapidly. Second,
its non afterburning TF-34 engines, while not being the fastest ship in the air,
provide an extended pair of legs for the Hog, and enable it to remain loitering
over hostile areas long after F-16s are heading back to the gas pumps.
Third, the interchangeability of parts on the aircraft allowed damaged A-10s to
be repaired and returned to service very quickly.
Of course, no
conversation about the A-10 would be complete without a discussion of the A-10's
prime weapon: the GAU-8A Avenger 30mm cannon. Firing depleted uranium
projectiles at a rate between 2-4000 rounds per minute, the GAU-8 can rip
through a main battle tank's armor like a can opener. The Hog is a very
capable aircraft, and with the current EGI (embedded GPS/INS) updates, the A-10
will also be capable of carrying the new GPS guided JDAM (Joint Direct Attack
Munitions), thus extending its service life. So I ask you: who says
that 'low-tech', slow moving aircraft can't be deadly?????
For some time now,
I've heard may questions about which 1/48 kit of the A-10 is the best one to
build? This question comes up quite frequently on the newsgroup
rec.models.scale, and I thought that maybe it was time to write a Feature
Article here at ARC to answer some of these questions. Here goes:
KIT
EVALUATIONS (My Opinions Only!)
Note: It
should be pointed out that all of the available A-10 kits in 1/48 scale
represent A-10s in various production periods. None of the current A-10
kits in 1/48 come complete with LASTE/EGI mods, or DRAs for the Sidewinder
missiles. However, the DRA is pretty easy to scratchbuild if you can get
your hands on a pair of F-4 Sidewinder rails (I robbed mine form the Monogram
F-4C/D Hi Tech kit). In addition, none of the 1/48 offerings feature
outstanding weapons (although the Maverick missiles featured in the Monogram kit
are pretty good), so right off the bat, I'd suggest replacing the included
weapons with spares from other kits. A good supply of Rockeye cluster
bombs and Mk. 82 LDGP bombs comes with the Academy F-15E kit, as well as some
LGBs, as this kit is a virtual treasure trove of spare weapons!
Alternatively, I'd recommend any of the excellent weapons sets offered by
Hasegawa to arm your A-10. As a
side note, probably the most accurate kit at the moment in any scale is the
Italeri 1/72 A-10, which, despite what you may think about Italeri, is an
EXCELLENT kit, and well worth considering in 1/72.
ESCI/AMT A-10:
The Esci A-10 (and
it's various re-issues by AMT), represents an early production A-10A is probably the worst of all the available 1/48
A-10 kits, although it does have some good points. It has some serious errors in shape and outline, which are most
noticeable around the forward fuselage. It simply doesn't have the correct
shape (at least to my eye), appearing to be too thin and pointy around the nose.
It lacks the surface detail of the Monogram kit, to include the lack of any
raised rivet detail on the aft fuselage. Also, I don't have the kit in
front of me at the moment, but I believe that the underwing chaff dispensers are
also missing form this kit.
The cockpit ,at
least in my opinion, is atrocious, as instruments
and side panels are represented by decals, and the ejection seat provided with
the kit is unrecognizable. Also, the canopy is molded in one piece, which
leaves you to get out your trusty razor saw should you decide to open the
canopy. Finally, I'd suggest (should you decide to build one), to throw
out ALL of the included weapons, and start over with some spares from other
kits, or from the Hasegawa weapons sets.
There are some good points to the kit, however. One good part about this kit is that it comes with the GAU-8 assembly.
Although this is pretty inaccurate, it does at least give you some idea of the
dimensions in case you want to scratchbuild your own. Another good point
of the kit is that the nacelle fronts are molded as separate pieces, which makes
construction and painting much easier in this area than the Monogram kit -
you'll see exactly what I mean when you get to this point in the article.
Also, the kit goes together much easier, and without a lot of fit problems that
plague the Monogram kit. The later AMT
re-releases include ground support equipment, and if you can get the kit
cheaply, I'd suggest buying it, if for no other reason than using the ground
support equipment. However, if you're determined to do a lot of updating
and scratchbuilding the cockpit (I don't think the Black Box set will fit the
kit), you can wind up with a nice model, but it will take a lot of work.
TAMIYA A-10:
The Tamiya kit, in
some ways, is superior to the Monogram kit in terms of fit. However, none
of the rivet detail is present on the aft portion of the fuselage, and the
airframe represents an early prototype. Shape and outline are generally
correct, but are a little off in some areas. Most notably, the vertical
tails are too small, and again, the forward fuselage is a little too
narrow. However, it's a decidedly easier build than the Monogram, and also
features a working canopy. You'll need to get an aftermarket ACES II seat
for the cockpit, as the kit comes with an ESCAPAC seat, and the weapons supplied
with the kit are not so hot - use the Hasegawa weapons instead. All in
all, not a bad kit, but not quite up to the Monogram standard in this
case. This would be my second choice for a build-up (see my entry in the Gallery), and is generally good
overall.
REVELL A-10:
The Revell kit (pre
R/M merger) was released in two different boxings: the JAWS scheme, and a
later Europe I scheme. These are identical except for the color of the
plastic. Not a bad kit, but again, represents an early prototype, and
suffers from raised panel lines (as does the Monogram). The kit is getting
more and more scarce, and will probably become a collector's item someday, if it
isn't already. Actually, I kind of like the 'head-on' profile of the
Revell kit just a little better than the Monogram, although the TF-34 nacelles
appear to be somewhat oversized.
MONOGRAM A-10:
Clearly the most
accurate of all 1/48 A-10 kits produced to date. It features most of the
mods to the actual aircraft, is replete with raised rivet detail, and is very
accurate in shape and outline, although it does lack some basic mods to modern
A-10s, such as LASTE/EGI, the DRA, and the gun vent covers on the port side of
the forward fuselage. The problems with the Monogram kit are
twofold. First, it suffers from raised panel lines, and many of these
lines surround the rivet detail, which makes them hard to rescribe without
losing the rivets. Second, the fit of this kit varies from average to
outright horrible, and can be a real challenge to build. However, with patience
(LOTS of it!), and some basic modeling skills (along with some aftermarket
goodies), this kit can be turned into a real show stopper. We'll be using
the Monogram kit for this article. I haven't decided on the final markings
for the kit yet, although I'm leaning toward a Ghost Gray Massachusetts ANG
bird, but I figured that I've got plenty of time to get that figured out!
As I write this article, I'm not ashamed to tell you that I've already come up
with a few pitfalls along the way, and hopefully, you'll be able to profit from
my mistakes by avoiding them, and it'll make the kit that much easier for you to
build. Now - on to the kit!
First of all, I
scribed the entire kit prior to assembly. Now, this can get tricky, as you
have to scribe around raised rivet detail in some areas, so the trick is to
scribe the lines, and then clean up the burrs by shaving them down with a razor
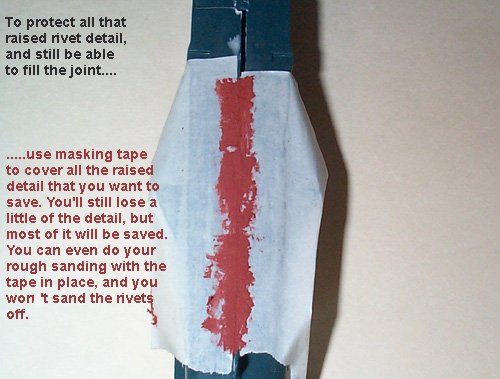
blade. To smooth out the lines in question, I taped around them, and then
rubbed them down with 5/0 steel wool a bit. Don't sand the lines, as
you'll take the rivets off as well! Other than that, there's not too much
to say about scribing the kit, as most of the panel lines are in the right
places - use them as a guide for scribing the new lines, and where you can, sand
them flush when finished.
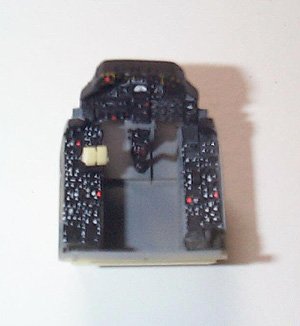
Just as you would in
most aircraft models, actual construction began with the cockpit (after scribing
the kit, as outlined above). Instead of using the kit's parts, I opted to
use the excellent Black Box cockpit set. the tub sidewalls, and instrument
panels were painted according to various reference books as well as photos that
I've taken over the years. the detail of the Black Box set (as with all of
their other sets) is phenomenal, and is the first step in really improving this
model. When all was painted and weathered, I attached the cockpit inside
the fuselage.
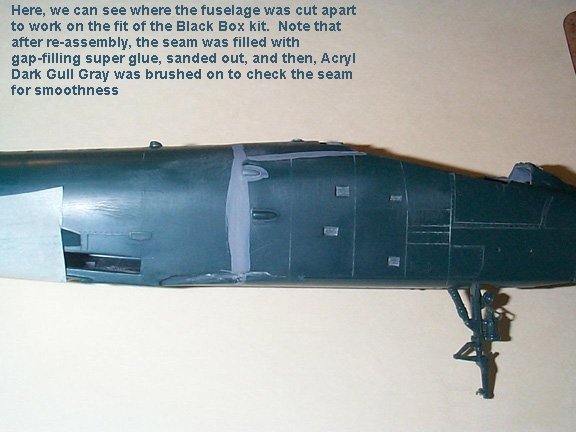
This is where I encountered my first
problem. I found that the nose gear well didn't fit after attaching the
cockpit. Since it was glued pretty solid, I wound up having to cut the
fuselage in half to work on the fit of these parts. I don't mind telling
you that this was not something I would have liked to do on this kit, as I was
really worried about getting everything to line up correctly after I was done
with the cockpit problem, but it was the only way to get the job done. After a
lot of test fitting, I got everything to fit, and re-joined the fuselage, using
gap-filling superglue to fill the seam..
Once this had been sanded and
polished out, I attached the wings, and went to work on filling some of the
seams. One thing that you have to be very careful about with this kit is
the fit of the wings to the fuselage. To do this, I attached both wings at
the same time with extra slow curing superglue, which gave me plenty of time to
manipulate the fit, and to make sure that the wings sat level. This is
extremely important, because you'll only get one chance at this, and if the
wings aren't perfectly level, the model won't sit properly either, and no amount
of paint or weathering is going to hide it! Once I was certain of the fit,
I used accelerator to set the wings into place, and did the same thing with the
horizontal tails. I recommend to keep checking your work as you go, and
once you've got the wings level, check the tails as you assemble them to make
sure that they're level also. The tails have locking tabs that fit inside
the fuselage (as do the wings), but this is not a guarantee that everything will
level out properly, and manipulating the parts by hand is the only way to go
here.
Now that the larger elements of
construction are out of the way, it's time to fill some of those seams.
This is where things really start to get a little dicey in some areas, and in
particular, the aft fuselage seam. For the larger seams, it was no problem
to fill them with gap-filling superglue, but the aft fuselage needs special
attention to get things right. What I did was to tape off the surrounding
areas, fill the seam with putty, and VERY carefully sand down the seam.
Actually, I did the rough take-down of the putty with a razor blade, and then
wet-sanded the seam with various grades of sandpaper until everything was
smooth. Not one rivet lost!
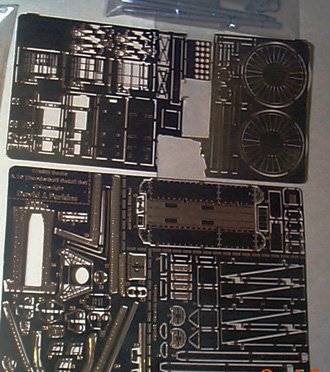
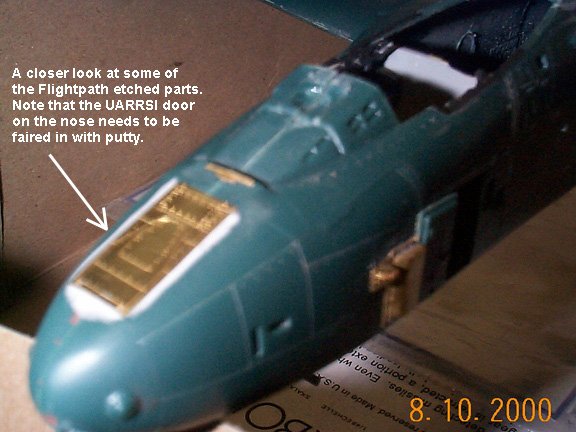
I mentioned before that I'll be
using the excellent Flightpath detail set along the way, and as you can see from
the above images, some of the details, such as the UARRSI door, and the gun vent
covers have already been applied. To be honest, I'm not terribly thrilled
with the way the UARRSI door came out, and as time goes on, I'm going to remove
the door, chisel out the area of the fuselage where it goes, and then reapply
it. The etched parts are a little thicker than I thought originally, and
by using putty to fair in the door, the shape of the nose was changed a little
too much for my liking, so this will necessitate a repair. It will
probably help to thin the etched parts down a bit with a motor tool to get
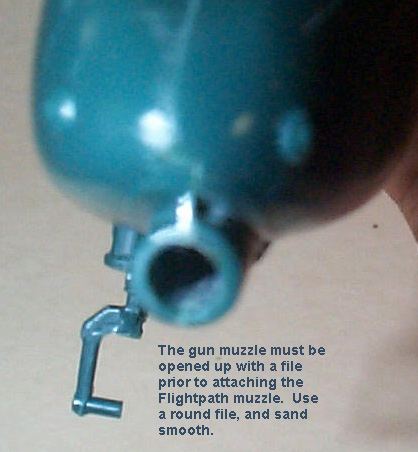
everything to the proper thickness to work with. At this point, I
also cut off the kit's gun muzzle, and drilled out the muzzle to accept the
Flightpath part. While I had the drill out, I also drilled out the APU
exhaust under the port nacelle.
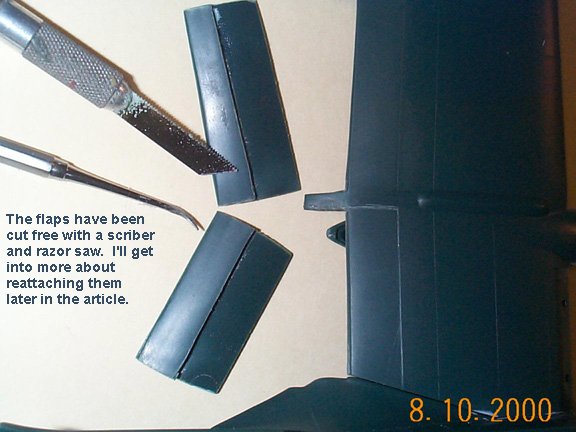
One thing that I was determined to do with this
kit was to drop the Fowler flaps, as every parked A-10 that I've ever seen has
had the flaps dropped. I cut the flaps from the kit's wings with a razor
saw and a scriber, and cleaned up the resultant rough areas with
sandpaper. The flaps will have to be extended a bit, which I'll be
accomplishing with sheet styrene, and then reattaching the flaps in their
dropped/lowered condition. Also, I split the decelerons and closed them,
as I've never seen an A-10 on the ground with them open, except maybe to test
their operation. Normally, the only time you'd see these open is when the
aircraft is actually landing, so I figured that this was a little
unrealistic. This is easy to do, by the way - simply cut them off, trim
the tabs down, and reattach them to the bracket, then glue them into the wings.
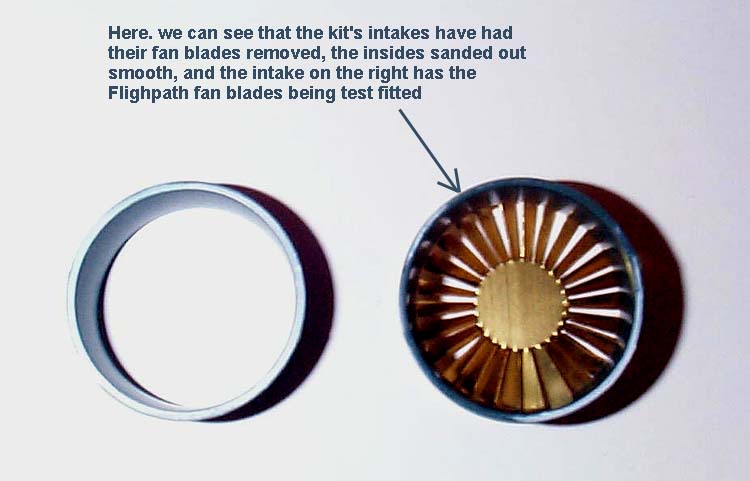
The intakes pose problems of their own. I
decided to go with the excellent Flightpath etched turbine blades to really add
some more realism to the model. I later discovered that this was going to
turn into a nightmare. For starters, you have to machine out the turbine
blades from the kit's intakes (and don't forget to save the spinners - there
aren't any in the Flightpath set!), and sand the intakes super smooth.
Also, it's necessary to remove a lot of material from the intakes to get the
blades to fit, so the plastic becomes dangerously thin in this area. Next,
each blade has to be bent out at the same angle, and then the assembly has to be
glued to the back of the intake. this requires the patience of a
neurosurgeon to get everything to fit, as well as a lot of filling,
sanding, and polishing inside the intakes. Also, you'll have to come up
with some sort of round backer plate to go behind each turbine blade, or else
you'll be able to see through each nacelle. After endless hours of
fitting, sanding, gluing, etc., I just couldn't get the damn parts to fit
correctly, and each time I tried to close the nacelles, one of the fan blades
would pop off and launch into the stratosphere. I got a hold of my good
buddy (and fellow ARC Editor) Steve Stohr,
who hooked me up with a second kit for replacement parts. A shame, really,
because these fans would have looked awesome, but I'd already invested way too
much time in them, and I wanted to move on to the rest of the kit - c'est la
vie, I guess.
This is where I'm going to leave
things off at this point, and I'll be back soon with the next part of this
multi-part article. I hope that this will help you to get through at least
the basic construction of the kit, and in Part II, I'll show you how to complete
construction, add the LASTE mods to the kit, and.......by the way: can you guess
what I'm going to do with this part, which was robbed from the ESCI
kit???? Never mind, I'll tell you in the caption below! ;-)
Also, I'll be providing you with a
list of references that I used to build the kit in one of the later
installments, but in the meantime, why not check out our excellent Walkaround
of the A-10 right here on ARC? We've got loads of photos taken by Uncle
Rick Chin, Burkhard Domke, Bryan Ribbans, Craig Baumer, Terry Sumner, and
myself, with more photos on the way! Catch you next time!!!!!!!
Steve
|
|